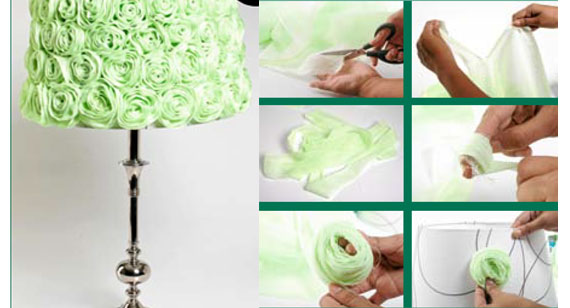
Unique DIY Creations are a fun an inexpensive way to spend an afternoon. You’ll be surprised at what you can knock up from just a few bits around the home.
The Shabby chic style is timeless and has never gone out of fashion, it can add elegance and a sense of romance into any room. The shabby chic look is unstructured and is all about throwing together different pieces in a light pastel colour palette.
Here’a an easy DIY tutorial on how to add some rustic beauty into your bedroom with this whimsical rosette lampshade.
Here’s what you will need:
A3 to 5 yards of Fabric: Gauze Fabric or Muslin works best (depending on the size of your shade)
Lamp Shade
Bison Kit Adhesive
Scissors
Steps:
STEP #1: Roll out your fabric measuring 2.5 to 3 yards in length (for a medium size shade)
STEP #2: Make small cuts in your fabric (lengthwise) approx. 1 inch apart
STEP #3 & #4: Seperate and start to tear your fabric, it naturally tears into a straight line since it is going with the seams/ thread.
STEP #5: Tear all of the fabric into strips until you end up with a large pile.
STEP #6: Take an individual strip of fabric and ball up one end of the fabric by pinching the fabric in between your thumb and index finger, then wrap the strip of fabric around it. You will start to get a small rosette look as you keep pinching the fabric and twisting it around itself (like a cinnamon bun).
STEP #7: After the full Rosette is formed it will look much like a flower, tuck the loose end into the middle of the rossette and it should maintain its shape.
STEP #8: Using the Bison kit glue, use a generous amount on the backside of the rosette and place it onto the lampshade holding it in place for at least 15 seconds to secure.
STEP #9: Repeat and Voila, your DIY rosette lampshade is complete!
Cost:
50 AED


